CSP-Multi / user manual V1.8
for software version F1.8

:: www.cspayments.pl ::
copyright © 2024
CSP-Multi / user manual V1.8IntroductionSafety of useEnvironmental protectionDescriptionApplicationTechnical data of CSP-MultiTechnical data of CSP-OUT8 TS35Technical data of CSP-OUT8 IP55InstallationHow to open CSP-Multi?Mounting to the wallConnection to wiring systemCSP-MultiCSP-OUT8Device operationConfigurationRun the MENUChanging the default PINCSP-Multi Function00 – time deletion01 - total amount of cash02 - current cash amount03 - sum of cashless payments04 - total number of payment codes entered05 – number of devices06 - addressing CSP-P1 modules07 – devices numbering08 – the selection of the devices number from the keyboard10 - operation of LED displays and keyboard backlight11 - brightness of displays and keyboard backlight20 - operation of sound signaling24 - operating mode of the CSP-P1 button30 - channel mapping to price list number31 - price list time unitPrice list constructionprice list amount settingsprice list time settingsExample of washing and drying price listhandling banknotestoken handling70 - open credit time71 - amount in price list which cashless payment start 72 - maximum amount of cashless payment in PLN73 - price list for cashless payments74 -value of the increment/decrement jump amount of the cashless payment amount75 - support for cashless terminal functionsFunctions of the CSP-P1 button80 - service initiation procedure81 - maximum number of service stops82 - maximum service stop time83 - action after the service stop timer expires84 - possibility of extending the existing service85 - turning on/off the selected channel (shower)86 - time until the service starts90 – changing the PIN code97 - displaying the firmware version98 - displaying the serial number99 - exit the menuAlarm signalCSP-Q paymentPermanent service codes and "free" codes - outside the sales recordsCSP PortalSupportMaintenanceWarranty
Introduction
Central Payment System (CSP) is an advanced service sales system.
This manual applies to software version F1.8.
The described version of the CSP-Multi access device is designed to support different types of appliances, such as washing machines and dryers, generally systems with differentiated service pricing.
Using CSP-Multi keyboard, we select number of device (1-32) and make the payment (coin, contactless card, smartphone, BLIK).
On the led display shows the remaining time of the selected device.
Through the CSP-OUT8 module, the control output for the contactor switching on the washing machine / dryer is activated.
Safety of use
Please observe the following instructions before turning on the device:
Read this manual carefully before connecting CSP-Multi device. It contains important information on installation, operation and safety. Keep the link to the manual so you can refer to it in the future in case of problems.
Installation the device according to the this installation instructions.
Do not plug in a device to the wiring system that has visible signs of damage or defects. In this case, contact your product dealer.
The manufacturer is not responsible for defects resulting from not following the recommendations of this manual. Following these recommendations is the basis for a possible claim for a defective device.
Environmental protection
 In accordance with the provisions of the Act of July 29, 2005 on waste electrical and electronic equipment, it is prohibited to place used equipment marked with a crossed-out wheeled garbage can symbol with other waste. A user who intends to dispose of a product is obliged to return used equipment to a point conducting such collection or to the dealer from whom it was purchased. The above obligations have been imposed in order to reduce the amount of waste generated from waste electrical and electronic equipment and to ensure an adequate level of collection, recovery and recycling of raw materials. Details of the law can be found at gios.gov.pl.
This manual is provided electronically. If you do not need to do not print it .
Help protect the environment!
Description
Application
CSP-Multi, access device of the Central Payment System is a independent access device used to service 1-32 washing machines or dryers. A maximum of 4 pcs CSP-OUT8 output modules can be connected to each CSP-Multi. Each module CSP-OUT8 has 8 external outputs, turned on for a limited time after payment. The device is powered of 230VAC voltage. Each output is operating of switching on a non potential relay, so you can put on anny supply voltage to input of system, at any output witch we paid we will get this voltage. For simplicity, a common supply and control voltage for contactors is used.
CSP-Multi is equipped with a backlight keyboard, sound signaling, and a clear three-segment LED display.
Technical data of CSP-Multi
housing 1.5mm stainless steel sheet
dimensions 162 x 326 x 120 mm (width x length x height)
tightness class IP55
supply voltage 230VAC +/- 10% 50-60Hz
power consumption of the device - maximum 10W
working temperature -20°C +50°C - installation inside and outside the building
relative humidity < 85%
weight 4,90 kg
Technical data of CSP-OUT8 TS35
TS35 rail housing – 7 modules wide
dimensions 124 x 78 x 50 mm (width x length x height)
tightness class IP20
supply voltage 230VAC +/- 10% 50-60Hz
power consumption of the device - maximum 10W
maximum load of each of the 8 outputs 10A/250VAC or 8A/30VDC
working temperature -20°C +50°C - installation inside building
relative humidity < 85%
weight 0,18 kg
Technical data of CSP-OUT8 IP55
hermetic housing IP55
dimensions 192 x 124 x 80 mm (width x length x height)
tightness class IP55
supply voltage 12VDC
maximum load of each of the 8 outputs 10A/250VAC or 8A/30VDC
power consumption of the device - maximum 10W
working temperature -20°C +50°C - installation inside and outside building
weight 0,48 kg
Installation
How to open CSP-Multi?

Mounting to the wall
The device should be screwed to a stable wall surface with four screws, beforehand prepare the appropriate connection wires.
Connection to wiring system
The connection of the device to the electricity wiring system should be made by a person with appropriate authorization in this area.
The device in the set does not have wires for connection. For this purpose, use a three-core power cable - flat or round wire of the following type: YDY Cu 3x1.5mm2 PVC 300V.
CSP-Multi
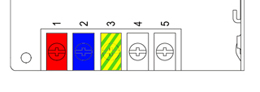
CSP-Multi main device is powered by 230VAC, according to the figure below.
1 - L / 2 - N / 3 - PE
CSP-Multi has a CSP-IFACE-MM communication interface board to which we connect the CSP-OUT8 expansion modules.
Optionally, CSP-P1 modules can be connected to CSP-Multi to present the elapsed paid time at the washer and dryer.
CSP-OUT8
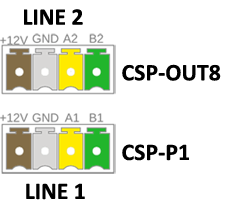
CSP-OUT8 output module should be connected to the CSP-Multi using the upper connector of the CSP-IFACE board [LINE 2]. CSP-OUT8 module has a double connector which should be wired with [LINE 2] according to the colors as below. The connector inputs have been doubled and are helpful for expanding the system with another CSP-OUT8 module in [LINE 2].
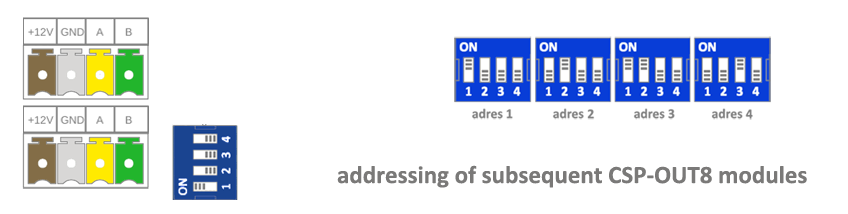
The blue switch is used to set subsequent addresses of the CSP-OUT8 modules. If one module is used (maximum number of washers / dryers = 8), the switch on the first position ON=1 indicates address 1 of the module. Subsequent modules should have subsequent addresses ON=2 / ON=3 / ON=4. The connection of the CSP-Panel-Multi and the correct addressing of the CSP-OUT8 modules are indicated by the blinking of the yellow STAT LED.
CSP-OUT8 module has a test mode in which all outputs are turned on, to do this, switch the blue switch to OFF in all positions.
The outputs of the CSP-OUT8 module are shown in the figure below.
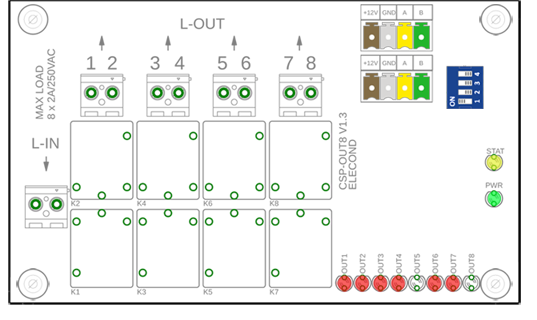
The module's input line (arrow pointing towards the connector) has duplicate L-IN connector contacts.
For 230VAC control of contactors, the main power supply of the system can be used, otherwise lower voltages can be applied to the L-IN input to control 24VAC/DC or 12VDC contactors.
The outputs of the L-OUT module (arrow pointing away from the connector) are numbered 1-8.
The maximum load of the CSP-OUT8 output is 2A/250VAC. In the case of washing machines and dryers, the CSP-OUT8 module is used to control external contactors, so that we can switch on higher powers at the outputs.
Device operation
The correct connection of the power supply to individual system components is indicated by the green LEDs lighting up.
CSP-Multi system is delivered to the customer after prior configuration and addressing.
In order to expand the system with additional modules, we must be previously addressed them.
Changes to configuration settings require reading the rest of the manual.
Configuration
The device is configured in the MENU using the numeric keyboard.
Run the MENU
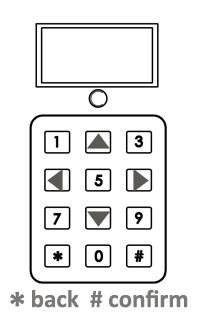
To run MENU, hold down two keys [ * ] and [ # ] simultaneously for 5 seconds. The device will ask us for a three-digit PIN code to access the device's MENU. The default PIN code after purchasing the device is 258. Confirm the code with the # symbol. The correct code will be confirmed by an intermittent double beep. The first available function, 00, will appear on the display.
We move through the MENU by scrolling through subsequent functions using the digit [6] forward and the digit [4] backward. We confirm with [ # ] and cancel (going back) [ * ]. The selected parameter is increased with the digit [2] and decreased with the digit [8]. Two minutes of inactivity in the MENU will automatically close it.
Changing the default PIN
The first thing you need to do in the MENU is to change the PIN code to your own. This feature is available under number 90. After run the MENU and entering the default kudu PIN [258], find the function number 90 using the digit [6] forward and the digit [4] backward. Confirm its selection [#] and enter the new three-digit PIN and confirm [#]. A correctly assigned new PIN will be confirmed by the white LED flashing twice. From now on, the new PIN will be valid.
CSP-Multi Function
All available functions of the CSP-Multi device using the CSP-OUT8 and CSP-P1 expansion modules as well as the parameters related to them are presented below. Underlined default - factory parameters of the device.
00 – time deletion
Holding the # key for 5 seconds will clear all active device service times.
01 - total amount of cash
Coin counter processed by the device - non-resettable cash counter All counters are presented using three digits of the display, reading from the left side of the displayed number. To display the continuation of the number, scroll right using the [6] key.
02 - current cash amount
Current counter of cash handled by the device - resettable cash total counter A counter useful for checking the cash received from the device. It should be deleted each time it is received.
Holding the # key for 5 seconds will clear the current cash counter.
03 - sum of cashless payments
Counter of cashless payments (tap card or other NFC only) handled by the device.
04 - total number of payment codes entered
Counter of entered payment codes.
This is not the number of codes purchased or generated in CSP-Portal system, but only the number entered into the device.
05 – number of devices
Available number of devices (washing machines / dryers) supported by CSP-Multi [1-32].
06 - addressing CSP-P1 modules
Addressing mode of CSP-P1 modules. After run [06 and #] functions, the [Adr] addressing mode will appear on the display. The modules' LED will light up white. Use the button to select the address corresponding to the next module. Addresses in a line cannot be repeated.
07 – devices numbering
It is possible to change the devices (washing machines / dryers) numbers from 1-32 to any other number from 1-999.
After run the function for the first channel _01, we assign a new number, changing the default 1 to any number, making the change by selecting [ # ], entering a new (unique) device number and confirming [ # ] again. We repeat the operation for each subsequent channel.
08 – the selection of the devices number from the keyboard
0 - it is not possible to select the device (washing machines / dryers) number from the keyboard, selection is made from the external CSP-Panel module 1 - possible selection of the device number from the keyboard
10 - operation of LED displays and keyboard backlight
0 - eco mode, the keyboard turns off 20 seconds after the last press, the displays turn off 20 seconds after the end of the service 1 - keyboard turns off 20 seconds after the last press, displays active 2 - keyboard and displays always active
11 - brightness of displays and keyboard backlight
0 - 25% 1 - 50% 2 - 75% 3 - 100%
20 - operation of sound signaling
0 - sound off 1 - sound on 2 - signaling, a sound signal reminds you about the expiring service time every 1 minute five minutes before the end of the service every 10 seconds in the last minute of the service every second in the last ten seconds of the service
24 - operating mode of the CSP-P1 button
0 - no action 1 - stopping the service (with time stopping) 2 - service suspension (without stopping time) 3 - end of service
30 - channel mapping to price list number
_01-X channel number, where X is the number of supported devices (parameter #05)
1-8 - number of price list
31 - price list time unit
_01-8 - number of price list
0 - minutes (displayed without rounding over 10 hours)
1 - hours (displayed without rounding over 10 hours)
2 - hours (displayed with rounding over 10 hours)
Price list construction
price list amount settings
We can define up to 8 price lists and 9 price list lines in each.
We can also define only one price list with one price item.
41 - price list no. 1 - amount
_01-9 - price list line
42 - price list no. 2 - amount
_01-9 - price list line
43 - price list no. 3 - amount
_01-9 - price list line
44 - price list no. 4 - amount
_01-9 - price list line
45 - price list no. 5 - amount
_01-9 - price list line
46 - price list no. 6 - amount
_01-9 - price list line
47 - price list no. 7 - amount
_01-9 - price list line
48 - price list no. 8 - amount
_01-9 - price list line
price list time settings
Each time item should be assigned to the corresponding price list and price item in it.
We can leave one price list with one time item for one price.
51 - price list no. 1 - time
_01-9 - price list line
52 - price list no. 2 - time
_01-9 - price list line
53 - price list no. 3 - time
_01-9 - price list line
54 - price list no. 4 - time
_01-9 - price list line
55 - price list no. 5 - time
_01-9 - price list line
56 - price list no. 6 - time
_01-9 - price list line
57 - price list no. 7 - time
_01-9 - price list line
58 - price list no. 8 - time
_01-9 - price list line
Example of washing and drying price list
We present the construction of two different price lists for two washing machines 10 PLN for 90 minutes and two dryers 8 PLN for 75 minutes.
#30 - channel mapping to the price list number
_01 - 1 // assigned to the washing machine number _01 price list no. 1
_02 - 1 // assigned to the washing machine number _02 price list no. 1
_03 - 2 // assigned to the dryer number _03 price list no. 2
_04 - 2 // assigned to the dryer number _04 price list no. 2
#31 price list time unit
_01 - 0 // minute time presentation for the washing machine number _01
_02 - 0 // minute time presentation for the washing machine number _02
_03 - 0 // minute time presentation for the dryer number _03
_04 - 0 // minute time presentation for the dryer number _04
#41 // assigning a price to price list no. 1
_01 - 010. // wash price 10 EUR for price list line _01 in price list no. 1
#42 // assigning a price to price list no. 2
_01 - 8.00 // drying price 8 EUR for price list line _01 in price list no. 2
#51 // assigning time to price list no. 1
_01 - 090. // washing time 90 minutes for price list line _01 in price list no. 1
#52 // assigning time to price list no. 2
_01 - 075. // drying time 75 minutes for price list line _01 in price list no. 2
Executive Summary
Under #30 we assigned price list numbers to two washing machines and two dryers.
Under #31 we defined the time presentation for each devices.
Under #41/42 we defined the prices for the washing and drying service.
Under #51/52 we defined the time of the washing and drying service.
handling banknotes
Option not available for CSP-Multi
To exclude a banknote from service, change the value under its number from [1] to [0]. 61 - acceptance of the banknote denomination [ 10 PLN ] 62 - acceptance of the banknote denomination [ 20 PLN ] 63 - acceptance of the banknote denomination [ 50 PLN ] 64 - acceptance of the banknote denomination [ 100 PLN ]
token handling
67 - token value C1 [ PLN ] 68 - token value C2 [ PLN ] 69 - token value C3 [ PLN ]
70 - open credit time
The time expressed in minutes during which it is possible to increase the loan according to the price list thresholds. After this time, the time (credit) below the first price list threshold is also abandoned (too little amount has been paid, the first price list threshold has not been reached). The time counts down from the moment of no reaction, after inserting the last coin or banknote. Cashless payment Cashless payment support - tap to reader with a card or smartphone.
71 - amount in price list which cashless payment start
(minimum amount of supported cashless payment)
_01-8 - price list number
1-9 // minimum amount of cashless payment defined by the item number in the price list line
We can define the value separately for each price list and it depends on the value set in the price list parameters #41-48.
72 - maximum amount of cashless payment in PLN
73 - price list for cashless payments
Increment/decrement mode of the cashless payment amount. 0 - after price list values starts from the position set with function [71] after the price list, outside the price list by the value defined with function [74] 1 - without price list, only after a jump defined by function [74]
74 -value of the increment/decrement jump amount of the cashless payment amount
75 - support for cashless terminal functions
0 - operation of terminal functions with external buttons [ - ] [ OK / * ] [ + ] 1 - support of terminal functions using keyboard keys
for [ - ] assigned on the keyboard (*) / for [ OK / * ] assigned on the keyboard (0) / for [ + ] assigned on the keyboard (#)
Functions of the CSP-P1 button
80 - service initiation procedure
0 - service provided immediately 1 - service suspended, time is counting down (resumption via input) 2 - service stopped, time stopped (resume via input)
81 - maximum number of service stops
(0/1/2/3) (0 = any quantity)
82 - maximum service stop time
(0-300) expressed in seconds (0 - no control) 60
83 - action after the service stop timer expires
0 - service suspension (without stopping time) - time will start but the solenoid valve will remain closed 1 - restoration of service operation - time will start and the solenoid valve will be opened
84 - possibility of extending the existing service
0 - impossible to extend the running service 1 - possible extension of the existing service
85 - turning on/off the selected channel (shower)
This function is useful in the case of permanent activation (free shower) or exclusion of a given shower from service (inability to select a given shower - failure). To activate a given device channel, call function [85]. In the next step, for the number corresponding to the channel (not necessarily the shower, if the numbers have been changed in function [07]), change the channel status using the [#] key. White means that the service is permanently enabled, purple means that it is not possible to pay for the service in a given channel (shower). No color means operation in normal mode. You can activate the mentioned functions for all channels at the same time, this is possible by dialing the number [0] assigned to all channels. Function useful for system installers.
86 - time until the service starts
The function is active when parameter [2] is selected for function [80] - this is the time expressed in seconds until the automatic start of the service. 0 - the service will start after pressing the P1 - START button
90 – changing the PIN code
the function is described at the beginning of the chapter
97 - displaying the firmware version
98 - displaying the serial number
99 - exit the menu
Alarm signal
The device is equipped with additional protection against unauthorized opening. To activate the protection, switch the blue switch on the CSP-IFACE-MM board from position 1 to On.
From now on, opening the device without entering the correct PIN code on the keyboard triggers an audible alarm signal. The signal will stop once the code is entered correctly.
CSP-Q payment
To make a payment, scan the QR code on the device or enter the four-digit device number on the website q.cspay.pl.
Payments can be made using any device with access to a website browser.
After selecting the device or service you want to pay for, select the payment amount and its form. Most Polish banks and the BLIK code are available.
We make payments in the banking application assigned to our smartphone or other device in which we accessed the payment page. The payment is completely safe because it takes place in a banking application that we are familiar with. After correct payment authorization, we will receive a 12-digit unique code also written as a barcode. The code must be entered successively on the keyboard. In order to use the code later, we can send it to your e-mail address. We will receive this suggestion at the end of the payment process. The code is a one-time code and does not expire. It is assigned specifically to the device selected during checkout. It can be used at any time, even at a later time.
It is possible to sell/purchase multiple codes with one payment, this is decided when configuring the device in CSP-Portal. We can use many codes received one by one or at any time at a later time. A good example of multiple codes are passes.
The website browser on a smartphone or other device on which we made the payment allows us to store the last three transactions in the purchase history (cookies). Thanks to your consent to store this data, we can later use the codes from the last three transactions. Additionally, from the administrator level in CSP-Portal, you can read previously generated codes or generate new service codes that will not be included in the sale of the service.
The codes are one-time codes, an attempt to use the same code again is signaled by a blue LED located under the device's display. The red color of the diode informs us about an incorrect code (most often it is an attempt to use the code on the wrong device that was selected during payment). The green color of the diode informs us about the correctly accepted code.
The white light indicates that the machine is in configuration mode.
Permanent service codes and "free" codes - outside the sales records
It is possible to generate permanent service codes. This type of code can be used many times and does not lose its validity.
It is also possible to generate "free" codes - outside the sales records. Thanks to this type of code, it is possible to provide the service free of charge, most often used as a free option to the main service. For example, we receive a free shower for a paid service during our stay at the campsite.
We generate the mentioned permanent and "free" codes in CSP-Portal. Full information on this subject can be found in the manual of this product.
CSP-Print code printer is used to efficiently generate "free" codes, without logging in to the CSP-Portal.
Ask the seller about this product.
CSP Portal
The purchased CSP device has free access to manage its basic functions. The login and password to the system will be sent after purchasing the device by the manufacturer. Please remember to change your password when you log in for the first time.
After logging in to the website portal.cspay.pl, we have access to the portal where we can make changes related to the operation of our CSP devices. Many CSP access devices can be assigned to one account.
The CSP-Portal user manual is available at https://cspay.pl/doc/
Support
You can find all the necessary information about our products on the website:
Any defects, comments and suggestions should be addressed to the manufacturer of the device:
ELECOND :: ul. Spacerowa 7, 78-400 Turowo :: tel. +48 94 374 94 88 :: office@cspayments.pl
Maintenance
CSP-Multi during its operation does not require maintenance.
The device itself does not raise the ambient temperature.
The device complies with the provisions of the directives:
low voltage (Low Voltage Directive) 2014/35/EU
electromagnetic compatibility (EMC Electro Magnetic Compatibility) 2014/30/EU.
Warranty
The manufacturer ELECOND company guarantees the use of the Central Payment System CSP-Multi for a period of 24 months from the date of the sales invoice.
During this period, the device will be repaired at the manufacturer's expense and effort, after setting a date for service repair. For this purpose, please contact the manufacturer.
ELECOND :: ul. Spacerowa 7, 78-400 Turowo :: tel. +48 94 374 94 88 :: office@cspayments.pl
After considering the validity of the complaint, the device will be repaired, within a maximum of 7 working days or a shorter period of time, as determined by another agreement with the purchaser of the system.
The manufacturer reserves the right to refuse to repair or replace the device, within the warranty period, if there is a concern that the device has been operated inconsistently with this manual.
The CSP-Multi / CSP-OUT8 / CSP-P1 Central Payment System was manufactured in Poland.