AC1-Cashless user manual V1.0
for software version 1.2

:: www.cspayments.pl ::
copyright © 2023
AC1-Cashless user manual V1.0IntroductionSafety of useEnvironmental protectionDescriptionApplicationTechnical specificationsComponentsInstalationMounting of deviceConnection to the electricity networkConnection to an extended deviceServiceMaintenanceWarranty
Introduction
Instructions for CSP systems can be found at www.cspay.pl/doc
Central Payment System (CSP) is an advanced service sales system.
This manual applies to software version 1.2.
Safety of use
Please observe the following instructions before turning on the device:
Read this manual carefully before connecting CSP-ON device. It contains important information on installation, operation and safety. Keep the link to the manual so you can refer to it in the future in case of problems.
Installation the device according to the this installation instructions.
Do not plug in a device to the wiring system that has visible signs of damage or defects. In this case, contact your product dealer.
The manufacturer is not responsible for defects resulting from not following the recommendations of this manual. Following these recommendations is the basis for a possible claim for a defective device.
Environmental protection
 In accordance with the provisions of the Act of July 29, 2005 on waste electrical and electronic equipment, it is prohibited to place used equipment marked with a crossed-out wheeled garbage can symbol with other waste. A user who intends to dispose of a product is obliged to return used equipment to a point conducting such collection or to the dealer from whom it was purchased. The above obligations have been imposed in order to reduce the amount of waste generated from waste electrical and electronic equipment and to ensure an adequate level of collection, recovery and recycling of raw materials. Details of the law can be found at gios.gov.pl.
This manual is provided electronically. If you do not need to do not print it .
Help protect the environment!
Description
Application
AC1-Cashless V1.0 works with any CSPayments production system that uses cash payments with coins.
AC1-Cashless V1.0 device is an element extending any CSPayments cash payment systems with non-cash - contactless payment.
We pay for the service using a payment card, telephone or watch equipped with the NFC function.
Device is widely used in access to toilets, paid laundries, pay TV systems, showers, playground lighting, solariums, saunas, and many other services.
Technical specifications
housing 1.5mm sheet metal, powder painted obudowa blacha 1.5mm malowana proszkowo
basic color RAL7035 (gray)
housing dimensions 130x130x250 (width x length x height)
enclosure IP20 ratings
the device has the first class of electric shock protection
power supply 230VAC +- 10% 50-60Hz
operating temperature 5°C - 50°C
relative humidity below 85% RH
device power consumption - max. 12W work mode
device power consumption - max. 5W in standby mode
weight 2,70 kg
Components
The device consists of two housing parts that fit together.

Other important system components:
power supply RS-15-12 Meanwell
control board AC1-Cashless V1.1
cashless reader Saturn 6500 / Uno 8
modem VendPay OTI Connect 3000
GSM antenna (cable length 250cm)
Instalation
Mounting of device
The device should be screwed to a stable wall surface with four screws - previously drilling holes in the wall for plugs of 8 mm diameter and 40 mm depth. Pins and screws are supplied with the device. A mounting template is included in the product box.
Connection to the electricity network
Connection to the power supply unit can only be done by qualified personnel according to applicable regulations.
AC1-Cashless is delivery with a cable enabling connection with electricity network. To do this, use the existing power contacts of the extended device.
Before connecting the AC1-Cashless extension to another CSPayments device, it is necessary to disconnect power supply of the extended device!
An example of connecting AC1-Cashless power supply to AC1-Master.
You can also connect the AC1-Cashless power supply wire to the input voltage terminals of the expansion device.
The GSM antenna necessary for the proper functioning of the system has a magnetic base, you can change its position.
Antenna cable with a length of 250cm allows to place it in a place with better GSM signal coverage.
Connection to an extended device
After correctly connecting the AC1-Cashless power supply, connect it to the extended device.
Two cables are used for this purpose - IDC 10 pin tape. To do this, follow the instructions below.
Disconnect the wire on the device that connects the NRI G13 coin validator with the control board.
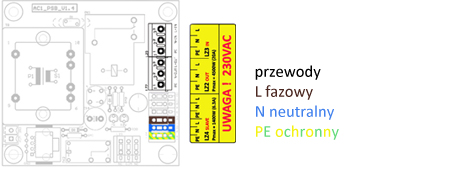
Connect the two cables with AC1-Cashless (according to the colors) in the places shown in the picture.
Plug the green wire to the coin acceptor, and red to the controller (socket on the edge of the control board).

After correct connection and switching on the device, after starting AC1-Cashless on the display we can see firmware [F1.0] and serial number [n0000] device. The time to start the cashless reader, depending on the level of GSM signal, may take up to 90 seconds.
Three horizontal lines on the LED display and the word "Hello! Select a product ”on the payment terminal - they indicate that the system is ready for use.
Configuration
AC1-Cashless can be configured by switching the red switch on the controller board to a specific position. Turn-on one of three switch positions activates the appropriate operating mode of the device.

BUZZER - turn-on the acoustic signaling of the system.
ZEROS - the payment amount presented on the LED display will be in the form of a decimal point, depending on the defined price list.
CONFIG - price list configuration.
Use the + - buttons to set the value for each time, according to the diagram below, confirming with OK.
Step-by-step pricing configuration:
enter the initial amount of the price list (LED flashes green)
enter the amount of the second price list threshold (LED flashes red)
enter the jump by which the value should change between the initial and the second price list threshold (LED flashes blue)
enter the amount of the third threshold of the price list (LED flashes red)
enter the jump by which the value should change between the next threshold and the previous one (LED flashes blue)
In this way, we define any quantity of price thresholds and jumps in value changes between the next threshold.
To finish programming the price list, at any time, before entering the amount of the next threshold (LED flashes red), press and hold the OK button for 3 seconds. End appears on the display, move the red switch to position 3 [CONFIG] down.
The smallest value that can be set is 0.10 (when ZEROS = On) or 1 (when ZEROS = Off). The largest value that can be set is 100.
Payment

To make a payment, follow the next steps.
Select the number of the paid service with the button (when you have only one service - go to the next step).
Use the + - buttons to set the amount.
Confirm the amount - OK button.
Tap the card, phone or watch with NFC function to the green reader.
Service
All the necessary information about our products you can find on our page:
Any defects, comments and suggestions should be directed to the manufacturer of the device:
ELECOND :: Spacerowa 7, 78-400 Turowo :: tel. 094 374 94 88 :: office@cspayments.pl
Maintenance
Device during its use does not require maintenance.
Operating temperature 5°C - 50°C – indoor installation only.
Relative humidity below 85% - adequate ventilation of the room.
The device itself does not raise the temperature of surroundings.
The device is compatible with the provisions of the directives:
low voltage (Low Voltage Directive) 2014/35/EU
electromagnetic compatibility (EMC Electro Magnetic Compatibility) 2014/30/EU
Warranty
Manufacturer, ELECOND company gives a 24 months warranty for the use of AC1-Cashless V1.0 systems. During this time, the device will be repaired at the expense and effort of the manufacturer, after prior arrangement of the service repair date.
For this purpose, please contact the manufacturer.
ELECOND :: Spacerowa 7, 78-400 Turowo :: tel. 094 374 94 88 :: office@cspayments.pl
After considering the validity of the complaint, the device will be repaired within a maximum of 7 working days or less, agreed under another agreement concluded with the buyer of the system.
The manufacturer reserves the right to refuse to repair or replace the device during the warranty period, if there is a concern that the device was operated contrary to these manuals.
The AC1-Cashless V1.0 Central Payment System was produced in Poland.